
Grandma Carosella’s Pizzelles
| Ingredient | About 180 Small Pizzelles | About 180 Small Pizzelles |
|---|---|---|
| eggs | 6 large | 6 large |
| sugar | scant 2 cups | scant 2 cups |
| butter | ½ pound (2 sticks) | 226g (2 sticks) |
| baking powder (optional) | 1 tsp. | 1 tsp. |
| whole anise seed | 1-3 tsp. | 1-3 tsp. |
| vanilla extract | 1 tsp. | 1 tsp. |
| salt | pinch | pinch |
| flour | 4-6 cups | 4-6 cups |
The wedding gift of a Pizzelle iron from mother to daughter has, for centuries, been a tradition in the Abruzzi region of Italy. This tradition was carried to the New World, which brought my grandmother’s Pizzelle recipe to her granddaughter-in-law along with the tool to make it.
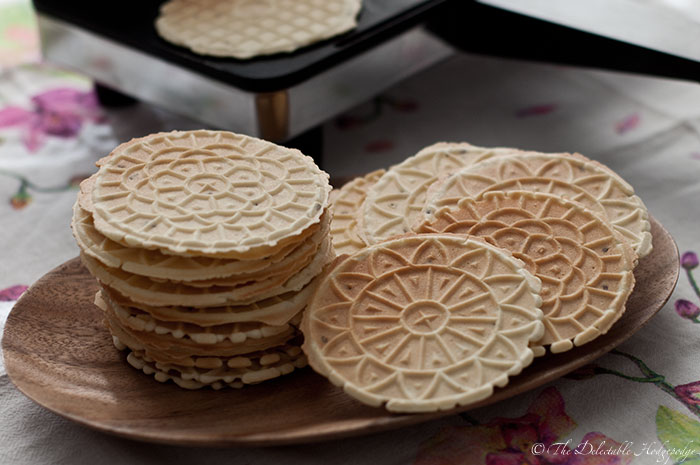
Pizzelles are similar to pressed cookies from other parts of Europe; delicate, anise-flavored, and wafer-thin, they resemble frozen circles of lace. While you’ll need a Pizzelle iron and a lot of time to make a batch, as well as some practice to get the technique and rhythm down, the result is both delicious and beautiful, and are a wonderful accompaniment to tea or a unique Holiday gift.
As with most of my grandmother’s Italian-American recipes, it assumes the use of a food processor; it can be done by hand, but the mixing will be quite a chore.
Preparation
- Let the butter come to room temperature, or microwave to soften.
- Before cooking them, lay a sheet of newspaper or paper towels under the iron to make clean-up easier, and lay out a sheet of smooth, flat paper towel large enough for two sets of pizzelles from the iron on which to cool them.
Directions
- Mix wet ingredients.
Process the eggs in a food processor until well mixed. Add sugar and process until blended. Add butter and process until light and fluffy. Add anise seed, pinch of salt, vanilla, and baking powder, and process until mixed. - Mix in flour.
Begin adding flour one cup at a time, processing after each cup until well mixed. Unless you have a large, powerful food processor, you will probably have to stop after about 3 cups; transfer to a bowl and stir the remaining flour in by hand. Stop adding flour when the dough is stiff enough to spoon into balls, but still relatively soft. - Chill dough.
Cover the dough and put in the refrigerator for at least a couple of hours, until very firm. It can be used warmer, but the colder it is the easier it will be to work with while baking. - Form balls
Once the dough is cold and stiff, begin making small balls, a dozen or so at a time; a standard Italian 4-pizzelle iron will need balls of roughly 1 teaspoon; 2-pizzelle irons closer to a tablespoon. They will always come out somewhat uneven in size, and you’ll need to bake a few to get a feel for the correct size ball; the goal is to roughly fill the circle without having too much extra around the edges once cooked. If you are working alone, you may want to form a few dozen balls of dough in advance, then return the rest to the refrigerator while you cook those, then repeat; if you have a partner, they can just make balls as needed to keep up with baking. - Bake.
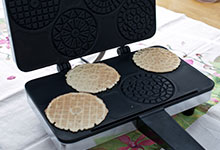 Preheat the pizzelle iron; it is not necessary to grease it with a modern iron. Once hot, flour your fingers, open it, and place a ball of dough on each pizzelle mold, slightly behind the center since when the lid closes it usually squeezes them slightly forward. If your iron has a timer, use that; otherwise just go by color, and it’s okay to peek. They cook very quickly, generally be around a minute per batch; you will usually want to take them out when just slightly golden, since they will continue to brown a bit and the goal is light to medium gold color (much lighter than the closely-related waffle cone).
 - Cool.
Remove the cookies with a fork or other tool soft and flat enough to extract them without scratching the iron, being careful not to tear them. Lay them flat on a paper towel or other smooth, flat surface to cool and immediately start the next batch. They come out very soft but will harden quickly; about the time the next batch comes out the previous one will be cool enough to stack, so you’ll want enough room to cool two sets at once. You should eventually develop a rhythm to get you through the remaining dough.
Notes
- The amount of flour necessary can vary considerably depending on climate and altitude, as well as taste—the more flour, the thicker and crunchier the pizzelles. Near sea level in a relatively humid climate, about 5 cups produces nice, light, crispy pizzelles. Under these conditions, baking powder is not necessary; it might help produce lighter pizzelles at higher altitudes.
- While it is possible to make pizzelles without getting your hands dirty, you’ll do much better to generously flour your fingers and drop balls directly from a plate onto the hot iron; if you take too long fiddling with a spoon, the first ball you put down will already be partly cooked by the time you get the last one on the iron, leading to uneven cooking.
- The colder the dough, the better—warm dough is very messy to work with, and the only disadvantage to cold dough is slightly longer cooking time.
- It doesn’t take much dough to make a pizzelle; if the dough is squeezing out the sides of the iron or leaving a large sheet surrounding the circular molds, you’re using too much. Slightly undersized pizzelles will have a nice, starlike pattern of points around the edge. On the other hand, the excess flange from oversized cookies can be easily broken off by hand, and is tasty as either a sample of how you like them cooked or a crunchy ice cream topping, if you save a pile of it.
- Pizzelles will harden in whatever shape you let them cool in. This makes it important to keep them flat while they cool if you’re going to be stacking them for gift giving, but it also means you can wrap them into cone, tube, or U shapes to fill them later; they make great ice cream cones (or sandwiches for flat cookies).
- After you’re done with the iron, let it cool then just wipe it thoroughly with a paper towel; store with a single paper towel sandwiched in it. Each time you use the iron, you will probably want to throw out the first set of cookies; these will clean any dust or leftover bits off, and serve as a test run for how quickly they will brown.